🎨 AI Images ✍️ Prompting πŸ”₯ Trending πŸ†• 2026 Guide βœ… Updated April 2026

What to Write in AI Image Generators to Get Perfect Results Every Time The practical prompt guide for turning vague ideas into stunning, accurate visuals β€” every single time

What to write in AI image generators: Person writing prompts on a laptop with artwork appearing on screen

Most people open an AI image generator, type something like “a dog in a forest,” hit generate, and then wonder why the result looks nothing like what they had in mind. The image might be technically competent β€” sharp, detailed, even beautiful β€” but it’s not the image they were picturing. That gap between expectation and output is almost always a prompt problem. Knowing exactly what to write in AI image generators is the skill that separates frustrating experiments from results you’d actually use.

This isn’t about memorizing keyword lists from Reddit threads. It’s about understanding how image generators interpret language, what kinds of descriptions they respond to, and how to structure your input so the output matches your vision. The principles here apply whether you’re using Midjourney, DALLΒ·E, Stable Diffusion, Ideogram, or any other tool β€” because the underlying logic is the same.

Whether you’re a designer trying to mock up concepts, a blogger looking for custom images, or just someone who wants to make something visually striking for personal use β€” this guide will change how you think about image prompts. No jargon, no magic words. Just the principles that genuinely work.

✍️ By GPTNest Editorial Β· πŸ“… April 27, 2026 Β· ⏱️ 13 min read Β· β˜…β˜…β˜…β˜…β˜… 4.8/5

Before You Read β€” 5 Things That Will Instantly Improve Your Image Prompts

Image generators don’t read minds β€” they read words. Every detail you leave out gets filled in randomly. The more specific your description, the less the tool has to guess.
Subject, style, and lighting are the three anchors. Almost every successful image prompt describes what’s in the scene, what visual style it follows, and how it’s lit. Miss one of these and results become unpredictable.
Adjectives carry more weight than nouns alone. “A forest” is open-ended. “A dense, fog-filled ancient forest at dawn with shafts of golden light” tells a visual story. Adjectives are doing most of the work.
Style references unlock a whole vocabulary. Phrases like “in the style of a vintage travel poster” or “shot on 35mm film” import a huge bundle of visual decisions instantly β€” color palette, texture, composition, and mood.
Negative prompts are your editing tool. Telling the generator what not to include is often more efficient than trying to describe a perfect scene. “No text, no extra limbs, no blurry background” removes the most common problems before they appear.

7

Core Prompt Principles

5

Prompt Building Blocks

10Γ—

Better Images, Same Tool

13m

Average Read Time

What You’ll Learn in This Guide

What to Write in AI Image Generators: The Anatomy of a Prompt

Understanding what image generators actually respond to
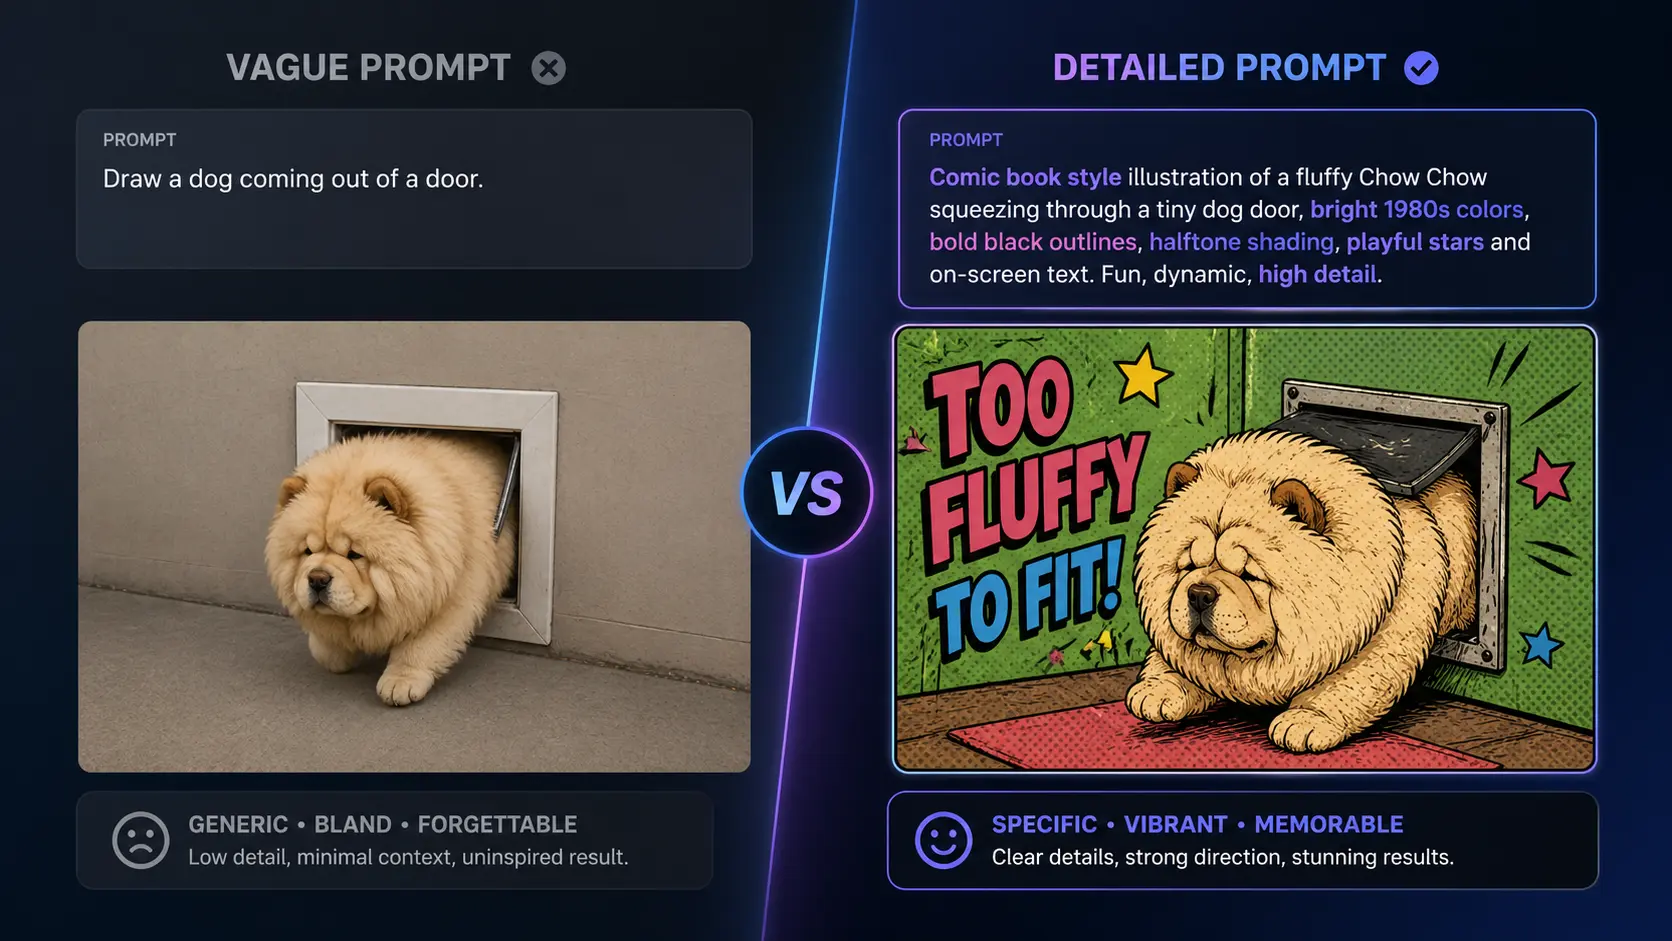
🎨 Start Here

A great image prompt isn’t a sentence β€” it’s more like a layered description that stacks visual decisions on top of each other. Every element you add reduces ambiguity and steers the generator closer to your intent. Think of it less like a Google search and more like a creative brief you’d hand to an illustrator.

The strongest prompts follow a loose structure: subject (what’s in the image), context (the setting or environment), style (the visual language), lighting (the mood and atmosphere), and technical details (camera angle, resolution cues, color palette). You don’t need all five every time, but knowing which you’re missing tells you exactly where to add more detail when results fall flat.

The Five-Layer Framework

Subject: What is the main focus? Context: Where is it? What’s around it? Style: What does the visual language look like? Lighting: What is the light source and quality? Technical: What angle, framing, or detail level is implied?

Weak vs. Strong β€” Side by Side

Weak: “A woman in a coffee shop.” Strong: “A young woman reading a paperback at a wooden table in a cozy, dimly lit cafΓ©, warm amber lamplight, shallow depth of field, shot on 35mm film, muted brown and cream tones.”

πŸ’‘ Key Insight

The number of details in your prompt roughly correlates with how much creative control you’re exercising versus handing off to the generator. Minimal detail = maximum creative freedom for the AI. Maximum detail = maximum control for you. Neither is wrong β€” it depends on what you’re making.

Describing Your Subject with Precision

The difference between a face and a character

The subject of your image is whatever the viewer’s eye lands on first. Describing it well means going beyond category labels (“a man,” “a dog,” “a building”) and adding the specific attributes that make it yours. Age, expression, posture, clothing, action, and relationship to the environment β€” each of these narrows the output space significantly.

One of the most common beginner mistakes is describing a person or object in isolation without anchoring them in space or action. “A chef” gives the generator almost no information. “A middle-aged chef in a white apron tasting sauce directly from a wooden spoon, standing at a professional kitchen stove, focused expression, steam rising from the pan” gives it a scene to build around.

Subject Description Checklist

Who or what: The main subject with key attributes. What they’re doing: Action or pose that shows life. Where they are: The immediate environment they’re in. Key visual details: One or two distinctive features that make it specific.

The “Action Anchor” Technique

Adding an action verb to your subject transforms a static description into a scene. “A fox” vs “a fox leaping through tall grass at dusk.” The action forces the generator to make compositional decisions that align with your mental image β€” and usually produces more dynamic, interesting results.

πŸ“– Real Case β€” Freelance Illustrator, Casablanca, 2026

A freelance illustrator using image generators to speed up concept work noticed her client presentations kept getting rejected at the initial visual stage β€” the images were generic despite being technically polished. She started writing full subject descriptions before opening any tool: age, clothing era, exact expression, spatial relationship to the background. Her acceptance rate in the first round jumped noticeably. The tool hadn’t changed. Her descriptions had become specific enough that the generator was working with her vision, not a statistical average of similar requests.

Style, Medium, and Artistic References

How to import an entire visual vocabulary in a few words

🎯 High Impact

Style references are one of the most efficient tools in image prompting. A single phrase like “vintage 1960s travel poster,” “ink wash painting,” or “architectural photography from a design magazine” loads a complex set of visual decisions β€” color palette, texture, line quality, composition, and mood β€” all at once. You’re not describing the image pixel by pixel; you’re invoking a whole visual tradition that the generator understands.

Medium references work the same way. “Watercolor,” “oil on canvas,” “linocut print,” “isometric 3D render,” “cinematic photography” β€” each of these carries an implicit set of visual characteristics. You don’t have to explain what watercolor looks like. The generator already has a model for it. You just have to say the word.

Style Categories Worth Knowing

Fine art styles: impressionist, art nouveau, bauhaus, surrealist. Photography styles: documentary, editorial, portrait, architectural. Illustration styles: flat design, vintage poster, children’s book, technical diagram. Digital styles: concept art, matte painting, isometric render, voxel art.

Combining Styles for Unique Results

Mixing two style references often produces the most interesting and original output. “Watercolor illustration in the style of a 1920s natural history journal” or “cyberpunk cityscape rendered in the style of a Japanese woodblock print” β€” the combination creates visual tension that generates genuinely distinctive images rather than generic interpretations.

βœ… Quick Habit

Keep a running list of style phrases that consistently produce results you like. For product mockups: “clean product photography on white, studio lighting, high resolution.” For social content: “bright, airy, natural light, soft background blur.” Reuse what works β€” style phrases are reusable assets.

Lighting, Mood, and Atmosphere

The element most beginners forget β€” and why it matters most

Lighting is the single most underused element in beginner image prompts, and arguably the most impactful. The same scene described with “bright midday sun” versus “golden hour backlight” versus “overcast diffused light” will produce three emotionally distinct images. Lighting is how you tell the generator what the image should feel like, not just what it should contain.

Mood descriptors work alongside lighting to set the emotional register. “Melancholy,” “serene,” “tense,” “playful” β€” these guide the generator’s choices about color temperature, contrast, and compositional weight. You’re essentially writing stage directions, and lighting is the most powerful direction you can give.

Lighting Phrases That Work

Natural: golden hour, overcast diffused, harsh midday, blue hour, moonlight. Artificial: neon glow, candlelight, single overhead spotlight, warm lamp light. Photographic: Rembrandt lighting, soft box, backlit silhouette, rim light.

Linking Mood to Color

Specifying a color palette alongside mood locks in the emotional tone with far more precision. “Melancholy, desaturated blue-grey tones” or “warm, joyful, rich amber and terracotta palette” β€” pairing mood with color prevents the generator from defaulting to an average interpretation of the emotion.

πŸ“– Real Case β€” Food Blogger, Rabat, 2026

A food blogger was consistently disappointed with AI-generated food images β€” they looked like stock photos, flat and clinical. She added three words to every prompt: “warm, soft, golden.” Suddenly images looked like they were shot in a real kitchen at late afternoon, with the kind of appetizing warmth that makes people stop scrolling. Same subjects, completely different feel. She later added “shallow depth of field, slight bokeh background” and the images became indistinguishable from professional food photography. The lighting and mood language was the missing piece.

Composition and Camera Perspective

The vocabulary of visual framing β€” and why it changes everything

Camera perspective and compositional framing give you direct control over how the image is constructed β€” not just what’s in it, but how the viewer experiences it. A portrait shot from below feels powerful and imposing. The same subject shot from eye level feels natural and intimate. Shot from above, it becomes vulnerable or documentary.

Composition terms borrowed from photography and cinematography are surprisingly well understood by image generators. You don’t need to explain what a “wide establishing shot” means β€” the term carries its own meaning. Build a small vocabulary of framing language and you’ll have direct control over visual structure in every prompt.

Framing Vocabulary to Know

Distance: extreme close-up, close-up, medium shot, wide shot, establishing shot. Angle: bird’s eye view, worm’s eye view, eye-level, Dutch angle, isometric. Composition: rule of thirds, centered symmetry, negative space, leading lines.

Depth of Field as a Tool

Specifying depth of field changes the visual hierarchy of your image. “Sharp subject, blurred background, f/1.8 aperture” draws the eye precisely to your subject and gives images a professional, photographic quality. “Everything in sharp focus, f/11” gives a documentary or technical feel. These cues are reliably interpreted by most image generators.

Using Negative Prompts Effectively

The editing tool that removes problems before they appear

Negative prompts β€” telling the generator what not to include β€” are one of the most consistently effective techniques across every image tool. They work because many visual problems are predictable: AI-generated hands tend to go wrong, backgrounds can get cluttered, faces can distort under certain conditions. If you know these tendencies, you can preempt them.

Some tools (Stable Diffusion, for example) have a dedicated negative prompt field. Others (like DALLΒ·E or Midjourney) respond to negative language directly in the prompt β€” “without text overlays,” “no watermarks,” “avoid busy backgrounds.” Either way, building a personal negative prompt list you can paste into any session will save significant iteration time.

Universal Negative Prompt Starters

For portraits: “no deformed hands, no extra fingers, no distorted face, no text.” For scenes: “no cluttered background, no watermarks, no low resolution.” For professional use: “no stock photo aesthetic, no generic composition, no oversaturated colors.”

Build Your Personal Negative List

After each session, note what went wrong consistently. Add those problems to your negative prompt baseline. Over a few weeks you’ll have a tailored list that prevents your most common issues before they occur β€” turning your prompting workflow from reactive to proactive.

Iterating Your Way to the Right Image

Why the third generation almost always beats the first

Treating each image generation as a standalone attempt β€” discarding everything and starting fresh if it doesn’t work β€” is the least efficient way to use these tools. Professional users iterate: they look at what the generator produced, identify specifically what’s right and what’s wrong, and make targeted adjustments to the prompt rather than rewriting everything from scratch.

Step 1 β€” Get a Usable Draft

Your first prompt is a hypothesis. Generate a few variations and pick the one that’s closest to your intent, even if it’s imperfect. You now have something concrete to react to.

Step 2 β€” Diagnose What’s Off

Is the lighting wrong? The composition awkward? The style too generic? Isolate the specific problem rather than noting the image is “not right.” One clear problem has a targeted fix.

Step 3 β€” Adjust One Variable at a Time

Change one element of your prompt per iteration. This way, when the output improves, you know exactly what adjustment caused it β€” and you can replicate it in future prompts.

Step 4 β€” Lock and Save Good Prompts

When you get an image you’re happy with, save the full prompt that produced it. These become templates for future work in similar styles. Your prompt library is your real asset, not any individual image.

⚑ Common Prompt Mistakes and How to Fix Them

The most frequent image prompting errors β€” and what to do instead.

MistakeWhat Goes WrongThe Fix
Subject only, no contextFloating subject with generic backgroundAdd environment, setting, and spatial relationship
No style referenceBland, statistically average visual outputAdd a medium or artistic style phrase
No lighting descriptionFlat, emotionally neutral imagesSpecify light source, quality, and color temperature
No camera framingUnpredictable composition and distanceAdd shot type and perspective language
Ignoring negative promptsCommon AI artifacts keep appearingBuild a personal negative prompt baseline
Rewriting prompt from scratchNo compounding improvement across sessionsIterate by changing one variable at a time
Too many competing elementsCluttered, incoherent compositionsLimit to one main subject with supporting details

πŸ† Pro Tips for Better Image Prompts Every Day

The Daily Prompt Checklist

Before generating: Have you described the subject, the environment, the lighting, and a style reference? If any is missing, add it in one sentence before hitting generate.
After the first result: What is specifically wrong β€” not just “not right”? The more precise your diagnosis, the more targeted your next adjustment.
After a good result: Save the full prompt, not just the image. The image is output. The prompt is your reusable tool.

Habits Worth Building This Week

Describe the lighting in every single prompt this week β€” even when it feels unnecessary β€” and compare results to your usual output
Start a prompt library document β€” one row per good result, with the full prompt saved
Build a negative prompt baseline and paste it at the end of every new session
Experiment with one style-combination prompt per day β€” two mismatched references often produce the most original results

βœ… The One Shift Worth Making Today

Before your next image generation session, spend two minutes writing out what you actually want in five layers: subject, environment, style, lighting, and camera framing. It sounds like extra work β€” it’s actually faster, because it prevents the three or four regeneration cycles that vague prompts always produce. The two minutes of description saves ten minutes of frustration.

Getting great results from AI image generators isn’t about finding the magic words someone else discovered. It’s about developing a consistent way of thinking about visual description β€” what a scene contains, what it looks like, and what it feels like. Those three questions, answered clearly before you type, will take you further than any prompt formula.

The users producing genuinely impressive AI images in 2026 aren’t necessarily more creative than everyone else. They’ve just internalized a small set of visual description habits β€” subject, style, light, framing, negative prompts β€” and they apply them automatically. Start with one section from this guide. Build the habit there first. The rest follows naturally.

⚑ Advanced Techniques for Getting More From Every Generation

Side-by-side comparison of vague versus detailed AI image prompts showing dramatically different generated image quality

πŸ’‘ Use Real-World References as Style Anchors

Referencing real visual traditions β€” “in the style of a 1970s National Geographic photograph,” “like a Soviet-era propaganda poster,” “as a page from a mid-century scientific illustration” β€” imports a richly defined aesthetic without requiring you to describe every detail. The more historically specific your reference, the more visually distinct the output.

βœ… Seed Numbers for Reproducible Results

Most image generators support seed numbers β€” a fixed random seed that reproduces the same image given the same prompt. Once you have a result you like, note the seed and save it with your prompt. This lets you make targeted prompt adjustments while keeping the overall composition stable β€” a powerful technique for refining rather than regenerating from scratch.

⚠️ Don’t Overcrowd a Single Prompt

Adding ten visual elements to one prompt rarely produces a coherent image β€” it usually produces a cluttered one. Generators struggle with compositional complexity. If your vision requires multiple focal points or a complex narrative scene, consider breaking it into sequential images that work together, rather than asking one prompt to carry everything.

More AI Image & Prompting Resources

Scroll to Top