🎨 Image Generation ✍️ Prompt Writing πŸ”₯ Trending πŸ†• 2026 Guide βœ… Updated April 2026

How to Write Perfect AI Image Prompts (Step-by-Step Guide) From blank text box to stunning visuals β€” learn the prompt anatomy that actually works

how to write AI image prompts step-by-step guide 2026

Most people type a few words into an AI image tool and feel mildly disappointed with what comes back. The image is technically fine β€” maybe even impressive β€” but it’s not quite what they pictured. That gap between what you imagined and what you got almost always comes down to one thing: how to write AI image prompts that actually communicate what you mean.

The good news is that writing better image prompts is a learnable skill. It’s not about memorizing magic words or copy-pasting formulas from Reddit threads. It’s about understanding the structure of a good prompt β€” what information AI image models actually use, and how to give them more of it.

This guide walks you through that structure step by step. Whether you’re using Midjourney, Stable Diffusion, DALLΒ·E, or any other image generator, the principles here apply universally. No fluff. Just what works.

✍️ By GPTNest Editorial Β· πŸ“… April 25, 2026 Β· ⏱️ 13 min read Β· β˜…β˜…β˜…β˜…β˜… 4.9/5

Before You Read β€” 5 Things Every Great Image Prompt Has

A clear subject. Every strong image prompt names the main thing in the picture explicitly. Don’t assume the AI will infer your subject from context. Say it outright: “a red fox,” “a woman in a yellow raincoat,” “a futuristic city skyline.”
A defined style or medium. “Photorealistic,” “oil painting,” “flat vector illustration,” “pencil sketch” β€” this single addition transforms results more than almost any other instruction.
Lighting and mood. Light shapes everything. “Golden hour,” “overcast diffused light,” “dramatic side lighting,” “neon-lit night” β€” these words do enormous work.
Composition or framing. “Close-up portrait,” “wide establishing shot,” “bird’s eye view,” “rule of thirds composition” β€” models respond well to photography and cinematography language.
What to leave out. Negative prompts (or “avoid X” instructions) prevent recurring problems β€” extra hands, blurry faces, cluttered backgrounds. Knowing what to exclude is half the craft.

6

Core Prompt Elements

5

Common Mistakes Fixed

10Γ—

Better Images, Same Tool

13m

Average Read Time

What You’ll Learn in This Guide

The Anatomy of a Perfect AI Image Prompt

Understanding the structure that separates great results from disappointing ones

🎨 Start Here

Think of an AI image prompt as a brief for a visual artist who has never met you, doesn’t know your project, and has about three seconds to read your instructions. Your job is to pack as much useful visual information into that brief as possible β€” in the right order.

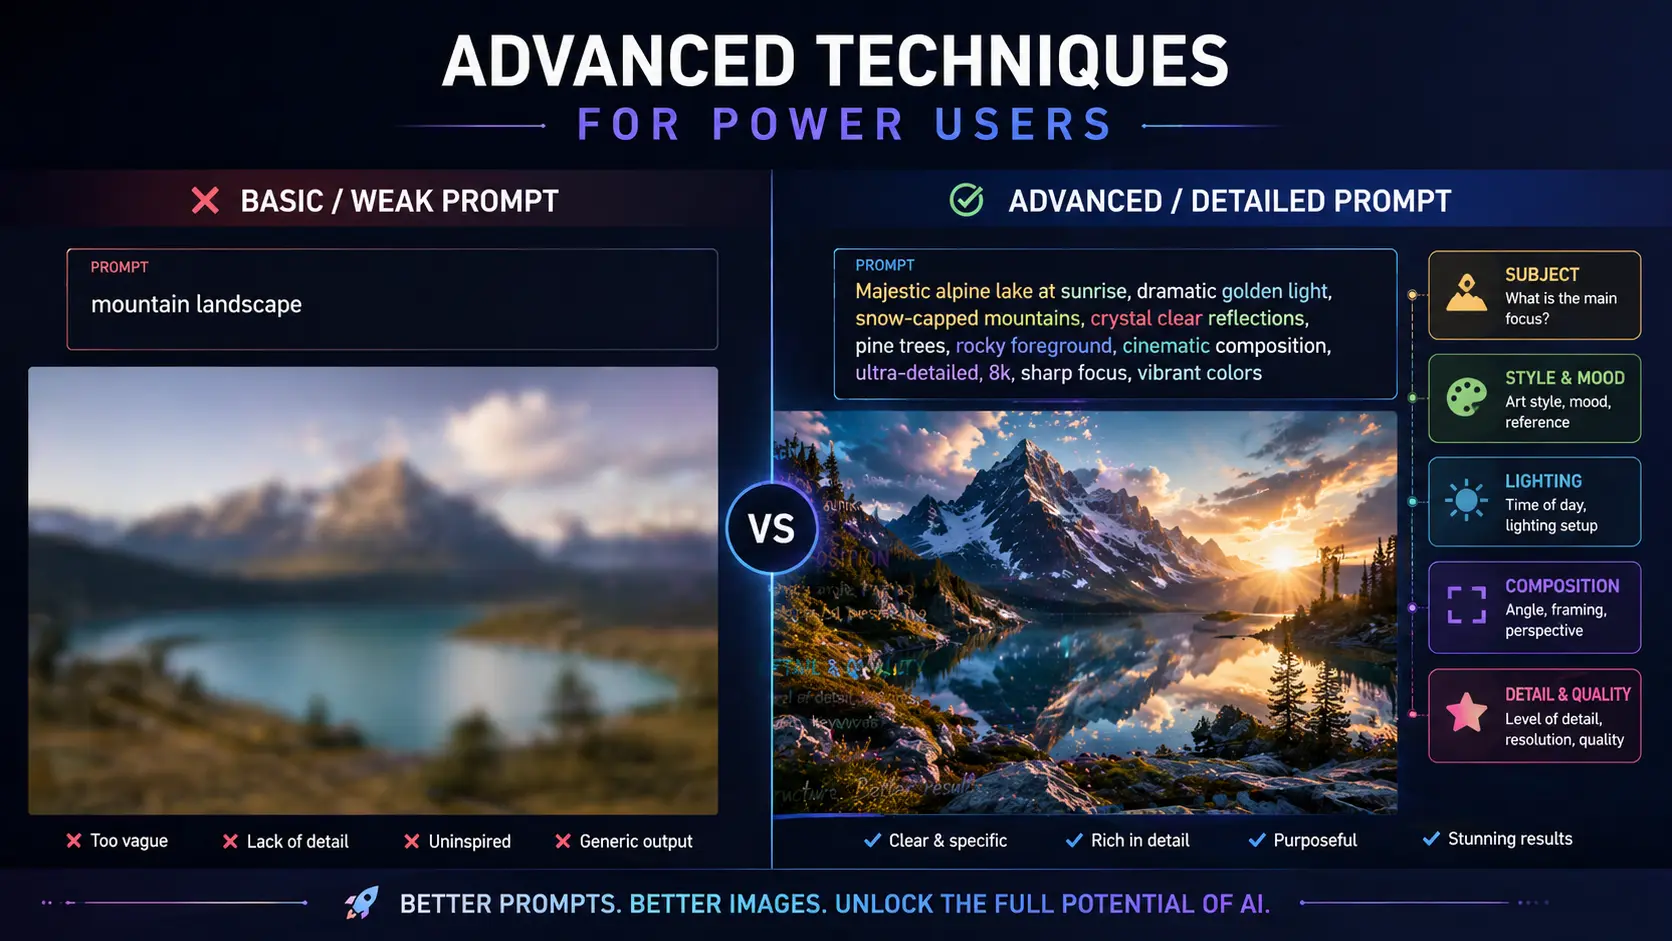
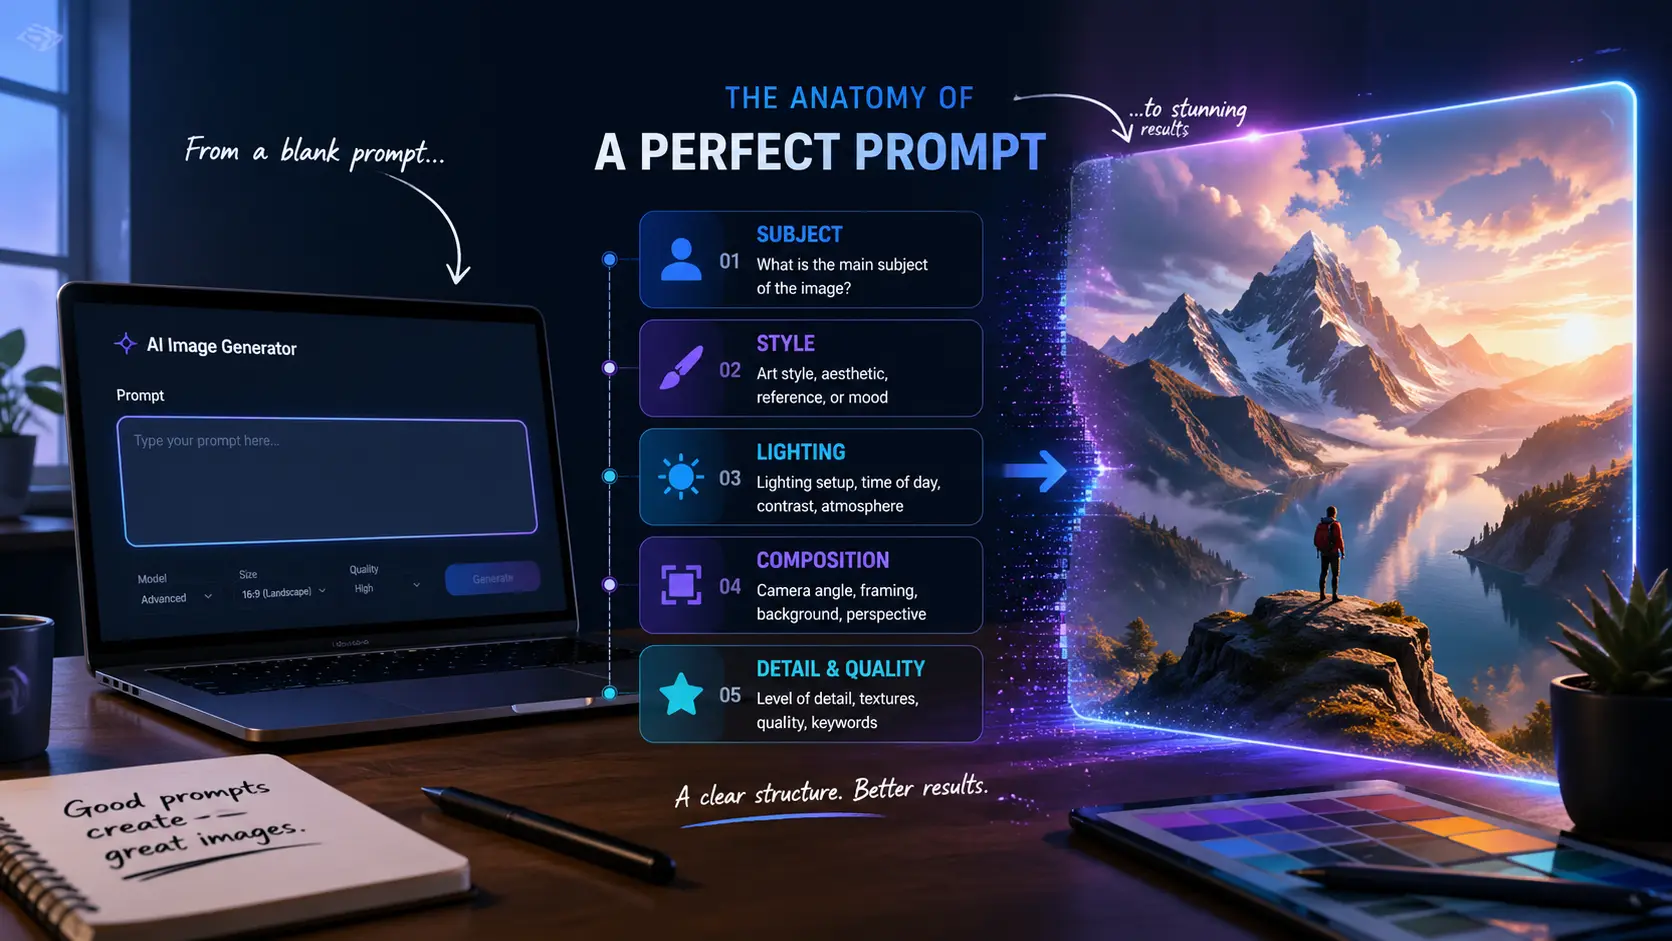
The structure that works most consistently follows this pattern: subject β†’ style/medium β†’ environment or background β†’ lighting β†’ mood β†’ composition β†’ technical details. Not every prompt needs all of these, but understanding them means you know what’s missing when results fall short.

Anatomy β€” A Working Example

Weak: “a woman in a forest”  |  Strong: “portrait of a woman standing in an ancient redwood forest, soft morning mist, dappled golden light filtering through the canopy, photorealistic, shallow depth of field, Canon 85mm look, serene and contemplative mood.” Every added detail narrows the result toward something specific.

Why Order Matters

Most AI image models weight earlier words more heavily. Lead with your most important element β€” usually the subject. Style and medium come next. Background, lighting, and mood follow. Technical specs go last. This priority order ensures the model doesn’t bury your main subject in a style or setting you added first.

πŸ’‘ Key Insight

Writing a good image prompt is closer to writing a scene description for a film director than typing a search query. Specificity creates direction. Direction creates consistency. Consistency is what separates professional-looking outputs from random results.

Describing Your Subject β€” More Than Just a Noun

How to make your main subject vivid, specific, and model-ready

The subject is the core of any image prompt β€” the thing you most want to see. But “a dog” and “a scruffy golden retriever puppy with floppy ears, muddy paws, and a red bandana” produce dramatically different images, even though both are technically a dog. The gap is adjectives, specifics, and context.

For people, describe visible attributes: approximate age, hair color and style, clothing, expression, posture. For objects, describe material, texture, condition, and size relative to surroundings. For scenes, describe what’s happening, what’s in the foreground, and what the background contains. You don’t need to include everything β€” but each added detail reduces guesswork.

Subject Description β€” Useful Attribute Categories

Physical: age, build, hair, expression, clothing. Condition: worn, pristine, ancient, futuristic. Action: sitting, running, floating, mid-conversation. Relationship to environment: surrounded by, emerging from, silhouetted against. Each category adds a new visual layer.

Before vs. After β€” Subject Upgrade

Before: “a scientist in a lab.” After: “a middle-aged woman scientist in a cluttered laboratory, holding a glowing blue vial up to the light, wearing a white coat and safety glasses, expression of focused curiosity.” Same subject, completely different image β€” and the second is much closer to something worth using.

πŸ“– Real Case β€” Graphic Designer, Casablanca, 2026

A freelance designer was generating product mockup backgrounds for a skincare brand. Her early prompts kept producing backgrounds that felt either too clinical or too generic. When she started describing the scene more specifically β€” “rustic wooden surface with soft natural light, a small ceramic bowl of dried botanicals in the background, warm off-white linen cloth” β€” the outputs matched her brand’s aesthetic closely enough to use in client presentations without manual editing. She saved her subject description as a reusable block and now opens every session with it.

Style and Medium β€” The Fastest Way to Upgrade Results

One word can shift your output from ordinary to striking

🎯 High Impact

If there’s one single addition that improves AI image results most reliably, it’s specifying a style or medium. Adding “oil painting,” “cinematic photograph,” “flat vector illustration,” or “ink sketch” completely reframes how the model interprets every other word in your prompt. It’s the difference between a vague vision and a clear visual language.

Beyond broad mediums, you can reference artistic movements (“Art Nouveau,” “Bauhaus,” “cyberpunk”), named visual styles (“Studio Ghibli-inspired,” “Wes Anderson color palette”), or specific technical looks (“shot on 35mm film,” “long exposure photograph,” “macro photography”). The more precisely you describe the look, the more consistent your results become across multiple generations.

Style Keywords That Reliably Work

Photography: photorealistic, editorial photograph, documentary style. Illustration: watercolor, gouache, ink wash, digital illustration. Render: 3D render, Octane render, Unreal Engine. Art movements: impressionist, surrealist, minimalist. Film references: cinematic, noir, Kodachrome, golden-hour film grain.

Stacking Styles Without Clashing

You can combine two style references if they’re compatible. “Photorealistic with a painterly finish” or “flat illustration with subtle depth and shadow” work well. Avoid stacking more than two β€” three competing styles tend to produce muddy, inconsistent results. Pick your dominant style and add one modifier at most.

βœ… Quick Habit

Create a shortlist of five style phrases that match your typical use case. For a blogger creating food content, that might be “natural light food photography, clean white background, shallow depth of field, warm tones.” Save them. Paste the relevant one into every prompt as a starting point, then adjust from there.

Lighting, Mood, and Atmosphere

The invisible layer that separates memorable images from forgettable ones

Lighting is arguably the most underused element in beginner prompts β€” and the most powerful. The same subject lit differently tells a completely different story. A portrait with “soft diffused window light” feels intimate and editorial. The same portrait with “harsh single-source overhead light” feels tense and dramatic. Neither is better; both are intentional.

Mood works similarly. Words like “melancholic,” “joyful,” “tense,” “serene,” or “mysterious” seem abstract, but AI image models have learned strong associations between these words and visual choices β€” color temperature, shadow depth, subject expression, environmental details. These words do real work.

Lighting Terms Worth Memorizing

Natural light: golden hour, blue hour, overcast diffused, harsh midday. Artificial: neon glow, candlelight, studio softbox, practical lamp. Directional: side lighting, backlighting, rim light, silhouette. Quality: harsh, soft, diffused, dappled, specular. Each has a visual fingerprint the model recognizes.

Combining Light and Mood

The most evocative prompts pair a specific lighting condition with an explicit mood. “Golden hour backlight, nostalgic and warm” reads completely differently from “cold blue-grey overcast light, isolated and quiet.” The mood word doesn’t fight the lighting word β€” it amplifies it. Think of them as a matching pair.

πŸ“– Real Case β€” Content Creator, Rabat, 2026

A travel content creator was generating destination images for a newsletter and kept producing results that felt like stock photos β€” technically correct but emotionally flat. She added three words to every prompt: the time of day, a lighting quality, and one mood word. “Late afternoon, golden diffused light, dreamy” applied to her Marrakech street scene prompt transformed the output from generic to something that felt editorial and alive. Her open rates increased the following week. She credits the lighting layer specifically.

Composition, Framing, and Camera Language

Why photography and film terms dramatically improve AI image outputs

AI image models have been trained on enormous volumes of photography, film stills, and illustrated art. That means they respond strongly to compositional language borrowed from those fields. Saying “close-up portrait” or “wide-angle establishing shot” or “low-angle perspective looking up” tells the model exactly how to frame your subject β€” and it listens.

You don’t need a photography background to use this vocabulary. A small set of terms covers most situations. The key is being deliberate: if you don’t specify framing, the model will choose something statistically average, which is rarely what you pictured.

Framing and Shot Types

“Extreme close-up” (face or detail), “medium shot” (waist up), “full body shot,” “wide establishing shot,” “overhead bird’s eye view,” “worm’s eye view,” “Dutch angle.” Each creates a completely different relationship between subject and viewer.

Compositional Rules AI Understands

“Rule of thirds,” “centered symmetrical composition,” “leading lines,” “negative space on the left,” “subject in the foreground, blurred background.” These compositional instructions are well-represented in training data and translate reliably into visual structure.

Negative Prompts β€” What to Exclude and Why

The most overlooked tool for cleaner, more controlled outputs

Some AI image tools have a dedicated negative prompt field. Others require you to use phrases like “avoid,” “no,” or “without” within the main prompt. Either way, exclusions are one of the most powerful tools you have β€” because certain problems appear so frequently that addressing them upfront is faster than fixing them after.

The most common issues worth excluding in portrait work: distorted hands, extra fingers, blurry or uncanny faces, watermarks. In scene work: cluttered or chaotic backgrounds (if you want clean), unintended text, low resolution or pixelated areas. Naming these specifically in your exclusions prevents the most frustrating recurring problems.

Standard Negative Prompt Starter

A useful baseline for portrait work: “deformed hands, extra fingers, blurry face, watermark, low quality, oversaturated, plastic skin, out of frame.” For scenes: “text overlay, cluttered background, pixelated, watermark, low resolution, inconsistent lighting.” Adjust based on what keeps appearing in your specific results.

Build Your Personal Exclusion List

Every user develops recurring problems based on their prompting style and tool choice. Keep a running note of what appears when you don’t want it. After ten sessions, you’ll have a personalized exclusion list that handles 80% of your typical problems before the first generation runs.

Iterating Toward the Image You Actually Want

Why the best outputs come from refinement, not one lucky shot

Expecting a perfect result on the first try sets you up for frustration. Professional visual creators who use AI image tools treat the first generation as a rough draft β€” something to react to and refine, not something to accept or reject. The feedback loop between your prompt and the output is where the real work happens.

When something doesn’t work, diagnose it specifically. Is the style wrong? Add or replace the style keyword. Is the lighting flat? Add a lighting term. Is the background cluttered? Add it to your exclusions. One targeted change per iteration tells you exactly what fixed the problem β€” and builds your prompting intuition over time.

The Iteration Mindset

Run 2–3 variations of your base prompt before deciding whether the concept works. Vary one element at a time: try three different style keywords, or three different lighting conditions. This systematic approach reveals which variables have the most impact for your specific subject β€” and gives you a library of options to choose from.

Save What Works

When a prompt produces an image you love, save the full prompt text immediately β€” including the exact wording, order, and any negative prompts. This is your new template for similar images. Most experienced users maintain a document of 10–20 proven prompts they return to and modify, rather than starting from scratch each time.

⚑ Common Prompt Mistakes and What to Do Instead

The most frequent AI image prompting mistakes β€” and the direct fix for each one.

MistakeWhat Goes WrongThe Fix
No style specifiedOutput defaults to a generic, average lookAdd a medium or style keyword as the second element
Vague subjectAI picks the most common interpretationAdd physical attributes, action, and context
No lighting mentionedFlat, uninspired lighting in most outputsAdd a specific lighting condition and quality
No framing or compositionRandom crop and framing every timeUse photography shot type or composition rule
No negative promptsRecurring problems appear in every batchBuild a baseline exclusion list for your use case
Stacking too many stylesMuddy, incoherent visual outputOne dominant style plus one optional modifier
Giving up after one tryMissing results that were one tweak awayChange one element per iteration, diagnose the gap

πŸ† Pro Tips for Consistent AI Image Results

The Prompt-Writing Checklist

Subject: Is your main subject described with at least two specific attributes beyond just a name?
Style: Have you specified a medium, visual style, or artistic movement? If not, add one.
Lighting: Does your prompt include a lighting condition and at least one mood or atmosphere word?
Exclusions: Have you named the most common problems that tend to appear in your outputs?

Habits Worth Building This Week

Write prompts in a notes document before pasting β€” read each layer back separately
Save a style block for your most common image type
Run each prompt three times before deciding to revise β€” variation is normal
Keep a “winners” document with prompts that produced images you loved

βœ… The One Change Worth Making Today

Take your most recent AI image prompt and add three things: a style or medium, a lighting condition, and one mood word. Generate the same image again and compare. This single upgrade β€” three words or phrases β€” demonstrates the core principle of image prompting better than any guide can describe. Once you see the difference, you’ll never leave those elements out again.

Writing great AI image prompts is really just learning to communicate visually in a language the model understands. That language has a grammar β€” subject, style, lighting, composition, exclusions β€” and fluency comes with practice.

Start with one element at a time. Master subject description first, then add style, then layer in lighting and mood. Within a few sessions, you’ll have a personal system that produces results consistently above what most users get from the same tools. The tool hasn’t changed. Your input has β€” and that’s everything.

⚑ Advanced Techniques for Power Users

Side-by-side comparison of weak vs detailed AI image prompts showing dramatic difference in output quality

πŸ’‘ Use Artist Name References Strategically

Referencing a specific artist’s style (e.g., “in the style of Alphonse Mucha,” “reminiscent of Edward Hopper’s light”) loads a rich visual vocabulary in a single phrase. It’s a power move β€” but use it deliberately. Combine it with your own subject and constraints, otherwise the artist reference can overpower everything else and you end up with a copy of their work rather than your idea executed in their style.

βœ… Seed Numbers for Consistency

Most image generation tools support seed numbers β€” a value that locks the random starting point of a generation. Once you find a composition or character look you like, note the seed. You can then change other prompt elements while keeping the structural foundation consistent. This is the professional workflow for character-consistent content and branded visual series.

⚠️ Don’t Over-Prompt Into Chaos

More detail is better up to a point β€” but at extreme length, prompts start to contradict themselves or dilute attention across too many competing instructions. If your prompt exceeds 80–100 words and outputs are getting less consistent rather than more, try cutting it back. Keep only the elements that most directly contribute to what you’re trying to create. Clarity beats comprehensiveness.

More AI Image & Prompting Resources

Scroll to Top